We present here the results you can get by running performance tests with ATS and what it takes to achieve these results.
The test landscape
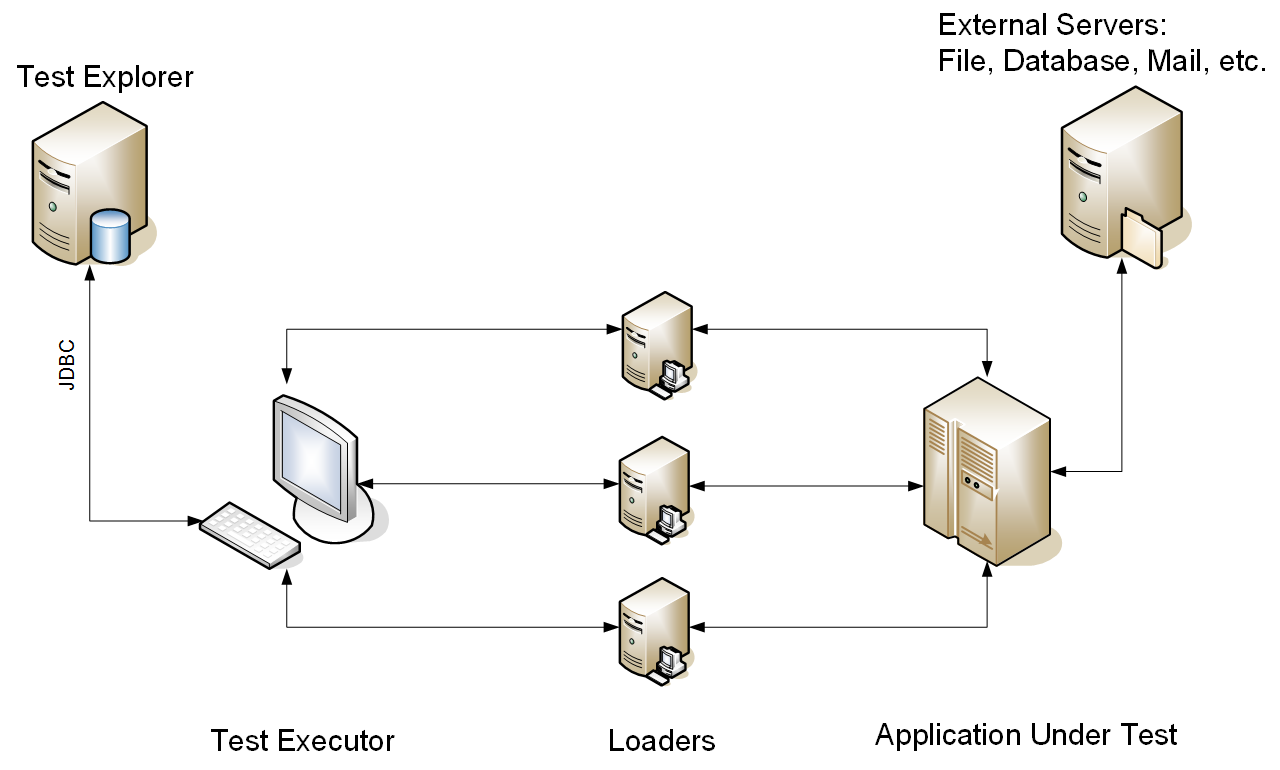
First, please have a look at the following simple diagram:
Whenever you work with your tests, it will be good to have an idea about the participating parties, their placement, and relations.
This diagram is an example which could be different than your own case but still:
- Test Executor is the application running the tests. It controls the test execution. It configures and sends commands to the Loaders which are able to run the test steps simulating the behavior of many users working together.
- Loaders are actual ATS Agents which do the server load
- AUT (Application Under Test) is the application we are testing.
It could be a single application or a number of applications working as one - Test Explorer is your main test results storage
- External Servers
Example test code
Before we get into the needed details, let's first have a look at some example
import com.axway.ats.agent.webapp.client.LoadClient;
import com.axway.ats.agent.core.threading.patterns.FixedDurationAllAtOncePattern;

// create a load client and provide the loader it works on
LoadClient loader = new LoadClient( LOADER_ADDRESS );

// set some threading pattern
// this one will run 5 threads(users) which will start together and will work for 20 seconds
// there will be 1000ms delay between each iteration
loader.setThreadingPattern( new FixedDurationAllAtOncePattern( 5, true, 20, 1000 ) );

// give a name to your action queue
loader.startQueueing( "FTP transfer" );

// create an instance of your action class
FileTransferActions ftAction = new FileTransferActions();

// list all the actions you want to run
ftAction.connect( SERVER_IP, SERVER_FTP_PORT, USER_NAME, USER_PASSWORD );
ftAction.upload( "C:/file.txt" );
ftAction.disconnect();

// now execute the requested action queue according to the threading pattern
loader.executeQueuedActions();
We first create an instance of the LoadClient class which knows the Agent(s) we will run our performance steps on. At ATS we call these steps actions .
Then we have to define the threading pattern . See the comments in the example to understand what this patter will do.
The next step is to list the actions that will be executed. The actions are listed between calls of startQueueing() and executeQueuedActions() methods. All these actions as a sequence are called iteration . So our test will execute a number of iterations, in our example, each iteration will contain 3 actions - connect, upload, and disconnect.
As soon as the executeQueuedActions() method is called, it all gets triggered on the Loader.
Example test result
When you go to Test Explorer UI you will see something similar to:
Here you can see what kind of threading pattern is used. How many times each action was executed, was it successful, how long time it took to executed etc.
ATS Performance tests terminology
Here you can see a description of the new words you met on this page
Preparing and running performance tests using ATS
Now it is time to see how all this can happen in real.
First, it is needed to invest some effort to make a middle layer(the so-called actions) and then you can write and run your performance tests which are specific for the testing needs of your Application under test.
Creating ATS actions
Here we show a working example of creating action classes you can use for your performance tests
Running performance tests
Here we show you the variety of options you have when using your action classes for your performance tests
Back to parent page
Go to Table of Contents


